|
 ShopTalk
|
- Title Page- Servicing the petcock
- Original Author- Chuck B
Because these pages may move to other servers
from time to time, we have put this information on our server for all to
view. If you are the original author, and you have a problem with that,
please contact us and we will remove this page.
Please checkout the "Original Authors"
web page.
|
Servicing the Petcock on your
Valkyrie:
The Petcock is quite simple in its construction and
operation. A correctly operating petcock on the Valk will only allow fuel to
flow when vacuum is applied (Small hose attached) no matter what position the
petcock is in. The "Off" position will not allow fuel to pass even
with vacuum. This allows removing most of the fuel from the bowls, if needed, by
letting the bike burn it off while running. However, for storage purposes I’d
go a step further and use the drain plug at the bottom of each bowl. My other
bike does not have an "OFF" position but rather a "Prime" or
always on position. All vacuum operated petcocks operate basically the same.
Once you get the tank off set it down on something soft.
Pickup the rear and roll it up on its nose. It will sit there and allow you to
remove the petcock without spilling gas. However, when you set the tank back
down flat hold your finger over the vent tube or gas will begin to siphon out.
(Makes a neat looking fountain!) Remove the petcock by loosening the flange nut.
Carefully pull the petcock out. You’ll see the fuel screen attached, which is
in two sections, one for "On" and the lower portion for "Res".
Mine had material all over the reserve portion and the lower section of the
upper portion. (Did that make sense?) I have a solvent tank, which I have filled
with a mild contact cleaner. Basic Carb. Cleaner would work. Just be careful
with the screen, its very delicate.
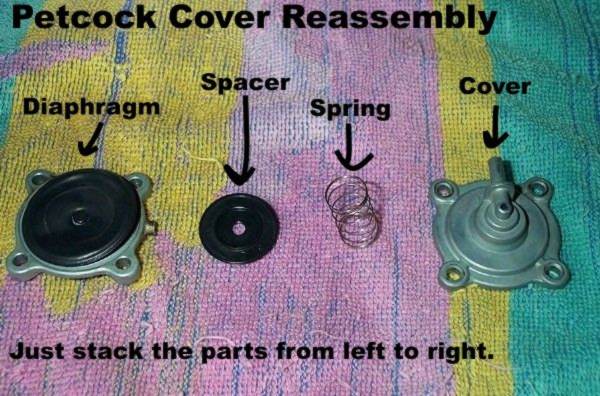
The rest of the petcock is made up of three sections. The
1st is the main unit which has the screen attached to. The 2nd
and 3rd pieces are attached to the main section with 4 Phillips
screws. The outer section is just a cover. The middle section holds the
diaphragm. Notice that this section has a small nipple protruding which has a
hole in the center. This is a check valve. Remember which direction this is
facing in relationship to the main section. There is a spring between the cover
and diaphragm. This spring pushes the diaphragm back when vacuum is released and
prevents fuel from flowing. Also note when you pull the cover off and remove the
spring (Don’t let it fly away!) The rubber diaphragm’s larger section faces
outward. Clean everything with your cleaner and reassemble. Make sure you VERY
carefully pull the ends of the diaphragm up and clean behind and between the
folds. If for any reason the middle section will not pull away from the main
section DO NOT force it. It simple means your check valve is plugged and vacuum
is holding it on. That’s why when you disconnected your fuel line gas
continued to flow until you turned your petcock to the "Off" position.
Just carefully lift up on the end of the diaphragm to release pressure. That was
one of the problems with my petcock.
Now that it is all back together. Its time to test it to
ensure it works properly and won’t require pulling the tank back off later.
Simply attach a (Clean) rubber hose onto the vacuum nipple. Apply a slight
vacuum to the hose while looking down the fuel outlet. Yes, your mouth works
great for this! Just don’t suck very hard. It’s very easy to overcome the
spring tension. As you apply vacuum/suction you’ll see the diaphragm pull away
from the main section. When you release vacuum/suction the diaphragm will SLOWLY
return sealing off the flow of fuel. If it does not either you assembled
incorrectly or your check valve is still clogged or defective. If all works,
you’re done!
Hope this helps! Chuck B
ValkyrieRiders.com
Message Board
ShopTalk
Just Pics
Valkyrie Hot Links