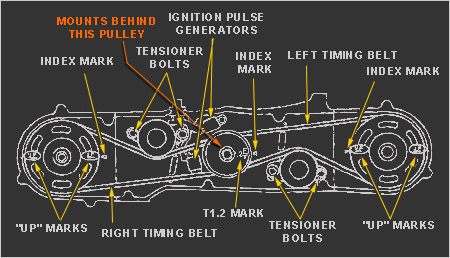
Completely read through the instructions provided in the following links before proceeding
with the timing wheel replacement. The instructions provided on this page are meant to
supplement the instructions provided on the
VRCC Shoptalk Web site.
Timing wheel installation
|
Trigger Wheel Help
The instructions provided below help make the proper replacement of the timing
wheel almost foolproof.
- Remove the timing belt dust cover, noting the different lengths of the bolts
and their locations.
- Put bike in 5th gear.
- Stand on the rear brake and break loose the crank bolt.
- The crank and cams will move a little after loosening of the crank bolt, so re-align the timing
marks as described in the VRCC Shoptalk instructions, then wedge an allen wrench between the
far left side of the left timing belt and the case, thus keeping the timing belt from moving
and possibly slipping off the cam gear.
- Note the tension of the left timing belt and the position of the left belt tensioner
(gauged marks are on the casing below the tensioner), then loosen the tensioner and slide it
all the way up and tighten it in-place. This will give the belt some slack.
- Remove the crank bolt and the round flat plate with the timing marks.
- Grab the crank gear and belt at the same time and slide it off the crank. Do not let go
of the belt and crank gear. Keeping them held together during this process will help
assure that they will be properly reinstalled, and the engine properly timed.
- With your free hand, remove the old timing wheel and replace it with the new one.
Make sure the timing gear is installed with the correct side facing out.
- Slide the crank gear and belt (still held together) back onto the crank,
aligning the keyway.
- Reinstall the round flat plate (noting correct alignment of the dimple) and the
crank bolt.
- Verify proper alignment of all the timing marks as described in the VRCC Shoptalk
instructions.
- Re-position the belt tensioner by checking both the belt tension as previously noted, and
by the gauged marks on the casing. Tighten the tensioner bolts to 19 ft. lbs.
- Tighten the crank bolt to 54 ft. lbs.
- Put the bike in Neutral.
- It has been noted that the new timing wheel is of a slightly smaller diameter than the
factory timing wheel. If desired, the gap between the timing wheel teeth and the magnets
of the ignition pulse generators can be adjusted to the optimal 0.018 inch. Small
adjustments of the ignition pulse generators can be made by gently prying using a large
screwdriver. Prior to adjustment, the gap should be checked on each tooth and the
adjustment made using the one with the least clearance.
- Reinstall timing belt dust cover. Replace the sealant on the threads of the one bolt
as indicated in the VRCC Shoptalk instructions.
|
